Handbook.
Index
Introduction to databases
A database is a structured collection of information organized in such a way that it can be easily managed and consulted. The organization of this information is achieved through the division into tables, which may be related or independent. A simple example is a phone directory represented in a table consisting of rows and columns: the columns (or fields) include data such as Name, Surname, Address, and Phone Number, while each row (or record) contains the information of a specific person.
Databases are computer tools managed through specific software, which allows users to view, add, modify, or delete data quickly and accurately. A major advantage of databases is their ability to store large amounts of information while taking up little digital space, thus overcoming the limitations of paper archives, which would require entire rooms to be stored.
Another significant advantage is the speed of information retrieval. With a database, it is enough to enter a search term into a search field to obtain results in seconds, a process infinitely faster than manually consulting paper documents. More advanced solutions also allow for sophisticated searches, using multiple criteria to refine the results.
Finally, the data within a database can be analyzed to extract valuable insights. Thanks to specific software connected to the database, it is possible to perform detailed analyses that can improve business decisions. For instance, by analyzing a store's product table, one can identify which items are selling more and which are selling less, helping to optimize the product offerings.
We use databases every day, often without realizing it: email systems use a database to manage messages, just as phone contact lists, customer management software, or project management programs do. Additionally, there are specific tools designed explicitly for database management, which allow users to create, modify, and consult them through more or less intuitive interfaces, simplifying the interaction with large amounts of data.
Online Databases
Online databases stand out for being accessible directly via the web, with data stored on cloud systems. This often eliminates the need to download and install applications on your computer: a browser and an internet connection are all you need to manage them.
One of the main advantages of this solution is the centralization of data in one place, which allows it to be easily shared with others and accessed from any device, fostering collaboration and improving efficiency.
Database and tables
Creating a new database
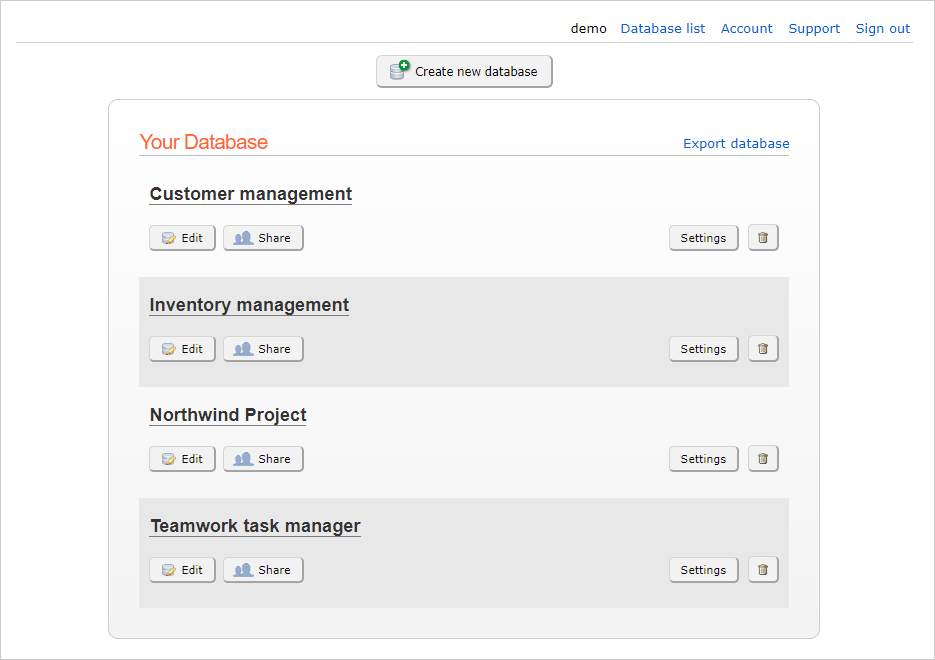
The first page that appears after creating a Basebear account is the one where you can create a new database. By clicking the Create New Database button, the system will display a window where you can enter the name of the database and choose whether to create one from scratch, copy from a template database, or duplicate an existing database from your account (this option requires that you already have another database available in your account).
Template databases are pre-configured and ready to use. There are several types available, such as intervention management, candidate database, project management, client management, sales agent management, and many others. Using a template is also a great way to explore how a database is structured. If you use a template, you can still modify it according to your needs.
The name and time zone of a database can be modified from the database list page by clicking the Settings button. The time zone is inherited from the database administrator, but it can also be set to a different one.
Deleting a database will result in the loss of all its data (including files and attachments), so it is essential to proceed with caution before performing this action.
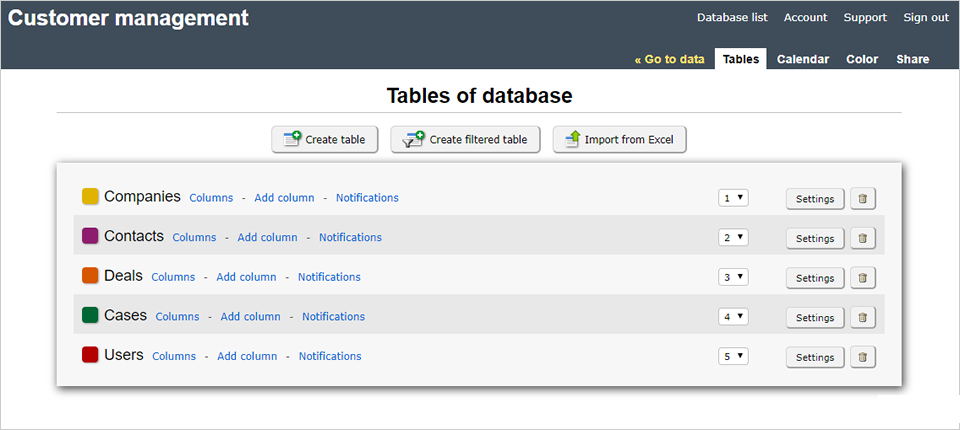
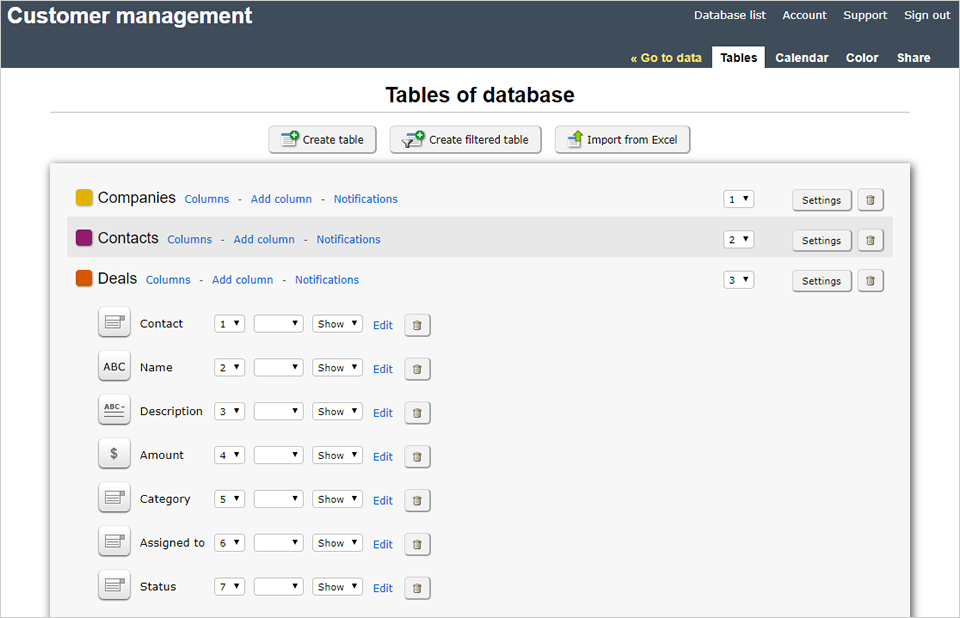
Creating Tables in the Database
The database can be seen as a container that holds tables, which in turn store the actual data.
When creating a new table, the only mandatory fields are the name and icon. The rest is optional. Here’s a detailed explanation of each option:
Records per page specifies how many records can be displayed on the screen at once. The arrow buttons allow you to navigate between pages to view all the data.
Users can export data allows users with access to the table to use the data export feature.
Users can modify multiple records at once enables or disables the ability for users with access to the table to modify several records simultaneously. To use this feature, users must also have edit permissions for the table.
Show creation and modification details displays when a record was created, who created it, when it was modified, and by whom. This information can be shown in the table or only in the record details.
Custom print template allows you to customize the print layout for a single record. First, you must create an RTF document using Microsoft Word or another text editor. In the document, you can place text and images as desired. You must then include placeholders for the record’s data fields by writing the field name inside square brackets, for example: [field name]. The document is limited to 100 paragraphs and 5 tables. Once created, the RTF file must be uploaded to the table settings. You can also choose whether the system generates the document in PDF or RTF format during printing. To print, access the data, select a record (row), and click the print button.
Deleting a table results in the loss of all the data and any attachments within that table, so proceed carefully. However, deleting filtered tables does not cause data loss, as these tables are based on data from regular tables.
Adding Columns to a Table
After creating a table, you need to add one or more columns (fields), which correspond to the data fields within the table. By clicking the "Add Column" button, a window will appear where you can select the type of column to add. Here is a brief description of each type:
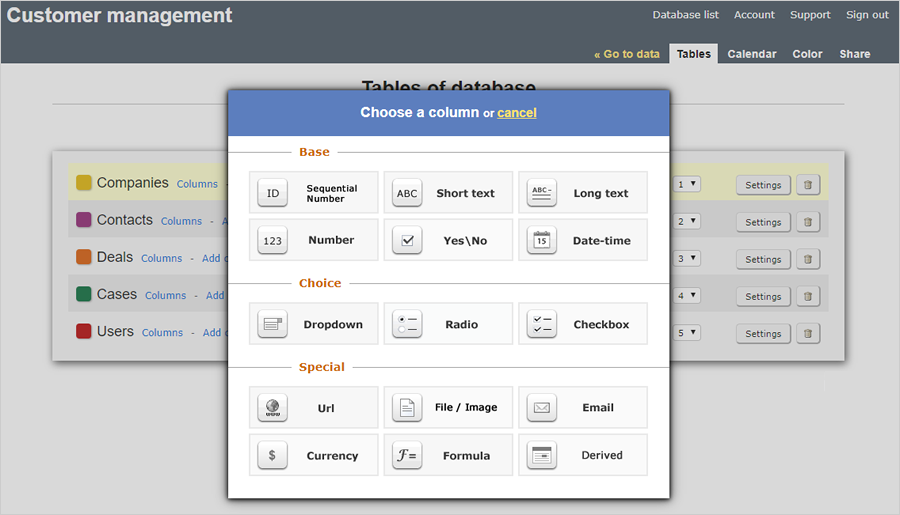
- Auto-incrementing number automatically adds an incrementing number to each record starting from 1.
- Short text is a field that shows a standard text box for entering up to 250 characters.
- Long text works like short text but allows for more than 250 characters. The text box is larger and supports multiple lines.
- Number accepts only numeric values and allows you to define the number of decimal places, display the value as a percentage, and show thousand separators.
- Yes/No accepts only "Yes" or "No" values, displayed as a checkbox in the form.
- Date and Time is designed for date and time values. You can define the display format and whether to include the time.
- Dropdown list displays a dropdown menu with selectable values. The values can be defined manually or taken from a column in another table. This field is useful for relating two tables. If a relationship with an external table is applied, you can choose to automatically update the value if the original changes.
- Single choice shares the same properties as the dropdown list, but the options are displayed immediately in the form, allowing the selection of only one value.
- Multiple choice works like single choice but allows for the selection of multiple options.
- URL is used to enter a link to a webpage. This field shows two text boxes: one for the link and another for optional alternative text to display.
- File/Image allows you to attach a file or image to a record. For images, you can choose whether to display a thumbnail in the table view.
- Email accepts only email addresses.
- Currency is similar to the number field and is used to hold floating-point values based on the selected currency type.
- Formula is a column used for performing calculations using the values from other columns within the same record. More information can be found here.
- Derived automatically inserts its value using a field from another table. To use this, the table must already have a dropdown list column linked to another table, which serves as a reference for the derived column.
Most columns share the following properties:
- Default value allows you to set a default value when entering a new record.
- Help message displays a help message next to the field in the form for entering and editing records.
- Required field forces the entry of a value when creating a new record.
- No duplicate values checks whether the value has already been entered when adding or editing a record.
- Show totals available only for numeric columns, shows the sum of the values at the bottom of each page of the table.
The table page also offers additional options for each column:
- Position allows you to change the position of a column relative to others.
- A-Z / Z-A allows you to sort the table records by this column in ascending or descending order.
- Show/Hide allows you to show or hide the column in the table view. The value will still be visible when viewing the record details. To fully hide a column from a user, you need to use custom permissions.
Creating Filtered Tables
In the table page of a database, you can also create filtered tables. When creating a new one, you must choose a regular table as a reference. Filtered tables display the same data as the reference table but allow you to apply one or more filter conditions. This way, you can have a partial view of the data. When working with data in filtered tables, any insertions, edits, or deletions will also apply to the data in the regular reference table.
Filtered tables are a powerful tool to provide users with a partial view of the records.
You can combine filter conditions in various ways using the "and" or "or" operators and keywords for dynamic behavior:
- TODAY() returns the current date. To be used only with date and time columns.
- TODAY(n) returns the current date plus the number of days specified in the parentheses. Only accepts integer values, including negative numbers. To be used only with date and time columns.
- TOMORROW() returns tomorrow's date. To be used only with date and time columns.
- NOW() returns the current date, time, and minutes. To be used only with date and time columns.
- EMAIL() returns the email of the connected user. Useful for filtering and displaying records based on the logged-in user.
- USERNAME() returns the username of the connected user. Useful for filtering and displaying records based on the logged-in user.
Accessing Data
After creating a database with its associated tables, you can access the data in various ways. From the database list, which also appears after logging into Basebear, you can click on a database's name to be redirected to the data in the first table of that database. From there, you can access other tables using the menu bar that displays the names of all the tables. Another way to access the data is by clicking on the "Go to Data" menu option found in the database edit pages.

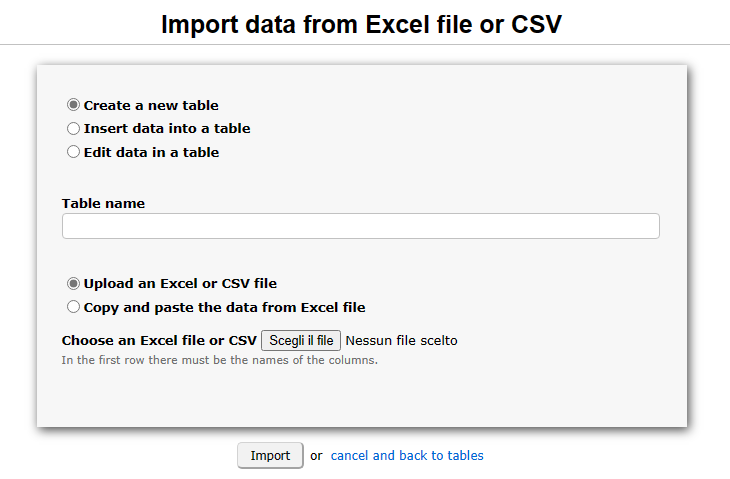
Importing Data from an Excel File
In the tables section, you will find the "Import from Excel" button, which allows you to access the functionalities for importing data from an Excel file. The system imports data only from the first worksheet. The data must be structured in a tabular format, with the column names in the first row. There are four different import options available:
- Create a new table: This option allows you to create a new table using the data imported from an Excel file. In this case, you must also specify the name of the new table.
- Insert data into an existing table: This option adds the imported data to an already existing table.
- Update data in an existing table: Using this option, it is possible to modify the data already present in an online table. In this case, you need to specify the column to be used as the primary key. The primary key is used to uniquely identify the records in the table and must be present both in the online table and in the import file. This allows the system to understand how to update the records. A "Progressive Number" column is often used as the primary key.
You can also import data using a CSV file (Comma-Separated Values), a text file where values are separated by characters like commas or semicolons.
Another import option is to copy the data from an Excel file and paste it directly into the text box provided on the page.
Note: The import process does not check for duplicate values in the data.
Email notifications
Email notifications allow sending messages to specific recipients containing some or all of the values of a record when it is inserted, modified, or deleted. You can access the notification settings by clicking on the "Notifications" link associated with a table. In addition to specifying a name for the notification, it is mandatory to enter at least one recipient and select one or more events among Insertion, Modification, and Deletion.
The subject and body of the email can be customized using special keywords, as described below:
- [TableName]: Inserts the name of the table.
- [DatabaseName]: Inserts the name of the database.
- [UserPerformedAction]: Inserts the name of the user who performed the action.
- [RecAction]: Inserts the name of the action performed (e.g., Insertion, Modification, or Deletion).
- [RecData]: Inserts all field values of the record involved in tabular format.
- [RecData([column name 1], [column name 2], ...)]: Inserts the specified field values of the record involved in tabular format.
- [column name]: Inserts the value of the specified column. In case of multiple records being involved, such as bulk modifications or deletions, the values of the first record will be used.
In the notification settings, you can also add a condition written using formula syntax, which serves as a criterion for sending the email.
Calendar
Records in a table that represent events with a specific date can be displayed in the calendar. In the database editing section, the "Calendar" menu allows access to the page where one or more tables can be linked to the calendar. To be linked, a table must contain at least one column of type date and time, and one column of type text. The date and time column is used to place the records in the calendar based on their temporal position, while the text column serves as a label to identify the records on the calendar. If the table includes a second date and time column, it is also possible to specify an end date for an event.
The calendar will be visible to all users, but each will only see the data for which they have the appropriate permissions.
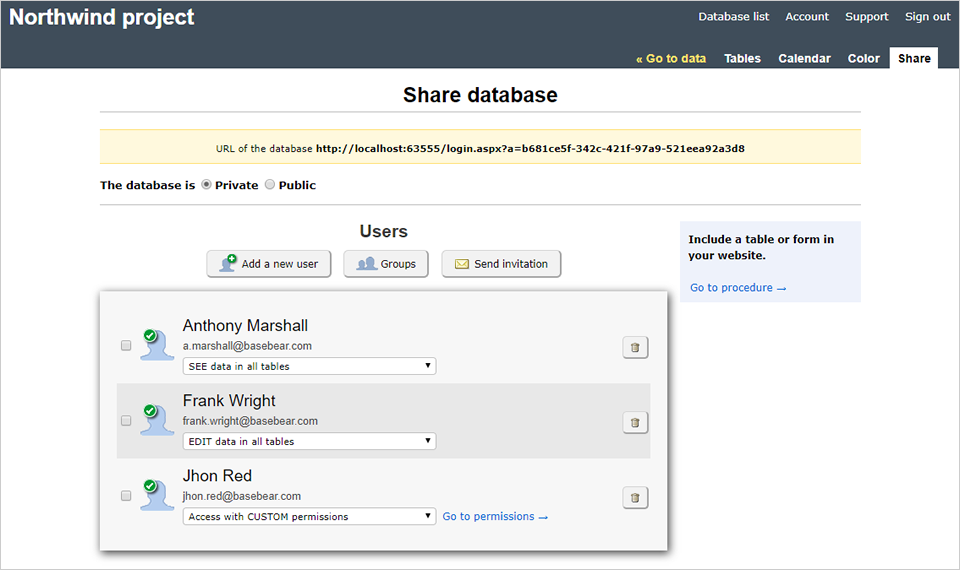
User management
On the database sharing page, you will find the tools to share the database with others. At the top of the page, you can choose whether to make the database public or private.
A public database is accessible to anyone who knows the database URL (highlighted in yellow) and does not require an email or password for access. For a public database, you can set access permissions for unauthenticated (anonymous) users via a dropdown menu that appears next to the public option.
Sharing your database online with others is one of Basebear's key strengths, and you can do it with great ease. By clicking the "Add User" button, you can invite your team members to access the database. All you need to do is enter their email address, with an option to immediately send the invitation email containing the link and login credentials. If preferred, you can send the invitation later by selecting the users and clicking the "Send Invitation" button.
Users can access Basebear either through the link received in the email or directly from the Basebear login page.
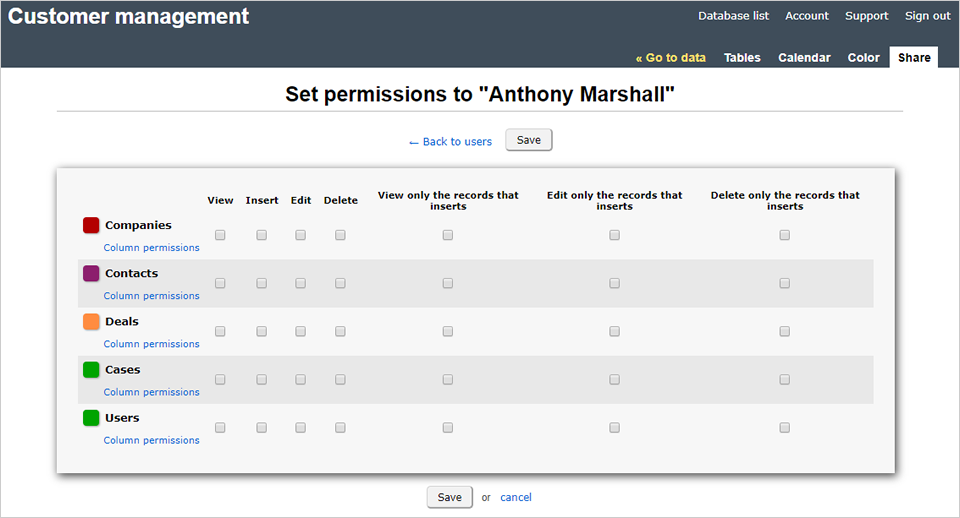
Authorization management
For each user, permissions can be set using a dropdown menu. The available options allow you to decide whether the user can view all database data, modify it, or access it with custom permissions.
Custom permissions allow you to define access at the table and column level. This means a user can be granted access to specific tables and columns only. Additionally, you can configure the permissions so that the user can see only the records they have entered. On the Sharing page, the "Groups" button enables you to assign permissions to a group once, simplifying and streamlining permission management. Users can then be associated with these groups, making the process more efficient and organized.
To assign a group to a user, you first need to create the group and then select it from the dropdown menu under each user.
Database and tables export
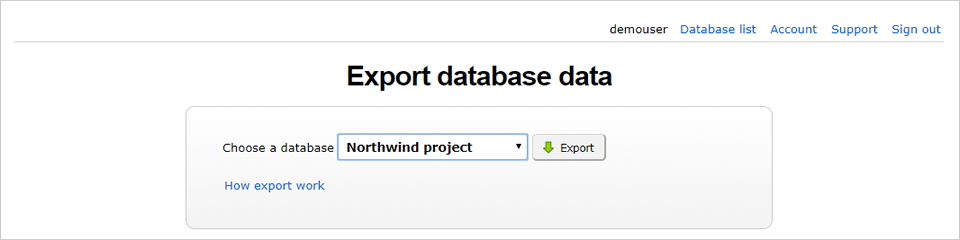
Exporting data in Basebear is extremely simple, and it's a useful feature for backing up your data whenever you need to.
On the database list page, there is a link labeled "Export Database" that directs you to a dedicated page. Here, you can select a database to export. The downloaded file will be a compressed archive containing the table data in CSV format, which can also be opened in Excel. This type of backup does not include files attached to table records; to export attachments, you will need to contact Basebear support.
Another way to export data is through the tabular data view by using the "Export" dropdown menu. From here, you can export only the data from the current table, with several export format options available: Excel, Excel 97-2003, HTML, CSV, and TSV.